So about three weeks ago I acquired the Huion L4S. I waited until now to open and use it so I could make my first unboxing video. Huion is one of the upcoming Chinese competitors to Wacom, who specialize in art tablets and touchscreen monitors for digital art. I must admit that with Huion also making this light pad, it has peaked my interest in their touchscreen monitors. I currently use an Artograph Light Tracer II for my light box work but I think that the Huion may soon replace it. Check out why in the video!

Showing posts with label tools. Show all posts
Showing posts with label tools. Show all posts
Tuesday, September 11, 2018

Monday, February 20, 2017
Great Art Books!
In an earlier blog response, I was asked for advice for good art books to help people learn better and if they really work. I thought hard about that and figured it would be a great blog subject to touch on. Keep in mind that everyone has a different learning and teaching style and many art books ARE NOT instructional, but rather, a showcase of an artist's talent. Sometimes that may inspire and sometimes, unfortunately, it can send people running in despair; losing hope that they will ever be that good. My focus will be on the art books that are instructional.
There are TONS of art books and it's impossible to cover them all, so I will focus on a few that have inspired me the most. Many of us start that way, with a core collection of books that help us find other on-par learning sources. That's the key here- to use these books to branch out to others that suit your needs.
So here's my list in no particular order:
 Jack Hamm - Drawing the Head & Figure
This is one of the most important books in my artistic development. Jack Hamm is extremely versatile stylistically and he breaks down realistic details effortlessly. He covers anatomy, how clothes respond to the human body and does so in a variety of mediums and styles. This book is part of a larger series, so if you like this one then check out the others.
 Bart Sears - Brutes & Babes/ Drawing Power
Bart Sears is a comic book veteran known in the industry for his work on Justice League Europe and on his monthly drawing column in Wizard magazine called Brutes & Babes. It was on this column that he taught the more technical aspects of comic book art that has rarely been touched on. The most popular subject was his teachings on achieving his very dynamic and detailed superhero anatomy. This book is a compilation of his Wizard columns although there seems to be a new more complete book in the works soon.

John Buscema - How to Draw Comics the Marvel Way
Here is another book dedicated to comics but this one goes beyond, as John Buscema was a traditional fine artist who happened to end up in comics. This book started it all, as most of the comic book world copies what John has laid down in these pages in an easy to understand way. This is great for beginners who want to learn how to draw in an exciting way.
 Scott Robertson - How to Draw
This is absolutely the most technical book on my list. IT'S A BEAST. It's one of the greatest, if not THE greatest book ever written on the subject of perspective. There's no human anatomy here, just all incredible mechanical draftsmanship. Scott Robertson is simply on another level and once (IF) you get through this book, you will be as well.
 Michael Leek - The Encyclopedia of Airbrush Techniques
When I was learning to airbrush when I was 14, this book was invaluable. It opened my eyes to the commercial potential of the airbrush beyond the little t-shirt shops that were so popular in the 80s and 90s. This book formed the basis to my coloring style that I still use to this day but digitally in Photoshop.
The next few books are honorable mentions that I don't personally own but I have flipped through them and/or know their instructional influence in the art community:
 Burne Hogarth - Dynamic Anatomy
This book is one of the best guides for rendering anatomy. Praised by critics and teachers alike for more than 40 years, this award-winning reference is recognized worldwide as the classic, indispensable text on artistic anatomy.
 Andrew Loomis - Figure Drawing for All it's Worth
Another classic, Andrew Loomis is revered for his clean, realistic style. His figure drawing raised the bar and this book teaches you how to do the same.
 James Gurney - Color and Light
This book is a must have. It's probably the greatest book for light and shadow study in a variety of mediums, particularly in color. The techniques, once learned, are very easy to apply to concept art and other subjects that don't exist in real life.
So there you have it! I'd love to hear from other artists out there who've gotten books that have influenced them and made a stylist impact on their work!
There are TONS of art books and it's impossible to cover them all, so I will focus on a few that have inspired me the most. Many of us start that way, with a core collection of books that help us find other on-par learning sources. That's the key here- to use these books to branch out to others that suit your needs.
So here's my list in no particular order:

This is one of the most important books in my artistic development. Jack Hamm is extremely versatile stylistically and he breaks down realistic details effortlessly. He covers anatomy, how clothes respond to the human body and does so in a variety of mediums and styles. This book is part of a larger series, so if you like this one then check out the others.

Bart Sears is a comic book veteran known in the industry for his work on Justice League Europe and on his monthly drawing column in Wizard magazine called Brutes & Babes. It was on this column that he taught the more technical aspects of comic book art that has rarely been touched on. The most popular subject was his teachings on achieving his very dynamic and detailed superhero anatomy. This book is a compilation of his Wizard columns although there seems to be a new more complete book in the works soon.

John Buscema - How to Draw Comics the Marvel Way
Here is another book dedicated to comics but this one goes beyond, as John Buscema was a traditional fine artist who happened to end up in comics. This book started it all, as most of the comic book world copies what John has laid down in these pages in an easy to understand way. This is great for beginners who want to learn how to draw in an exciting way.

This is absolutely the most technical book on my list. IT'S A BEAST. It's one of the greatest, if not THE greatest book ever written on the subject of perspective. There's no human anatomy here, just all incredible mechanical draftsmanship. Scott Robertson is simply on another level and once (IF) you get through this book, you will be as well.

When I was learning to airbrush when I was 14, this book was invaluable. It opened my eyes to the commercial potential of the airbrush beyond the little t-shirt shops that were so popular in the 80s and 90s. This book formed the basis to my coloring style that I still use to this day but digitally in Photoshop.
The next few books are honorable mentions that I don't personally own but I have flipped through them and/or know their instructional influence in the art community:

This book is one of the best guides for rendering anatomy. Praised by critics and teachers alike for more than 40 years, this award-winning reference is recognized worldwide as the classic, indispensable text on artistic anatomy.

Another classic, Andrew Loomis is revered for his clean, realistic style. His figure drawing raised the bar and this book teaches you how to do the same.

This book is a must have. It's probably the greatest book for light and shadow study in a variety of mediums, particularly in color. The techniques, once learned, are very easy to apply to concept art and other subjects that don't exist in real life.
So there you have it! I'd love to hear from other artists out there who've gotten books that have influenced them and made a stylist impact on their work!
Thursday, September 18, 2014
Workflow Walk-thru

Let’s look at my workflow. This changes a bit depending on my materials and style, client needs, etc. but for most of my line art, this will be my preferred workflow 90% of the time. Everyone does things differently so this ISN'T how you have to work but this offers new options. I work with a light-box and I got this technique from an artist by the name of Bart Sears and used it while studying animation in college.
Here, we are looking at a character that I designed to be used for a video game.
The main reason I work this way, is that I'm also a colorist and need my lines to be very precise and open. I don't use a lot of thick, black shading to allow the contrast and lighting to be determined in the coloring stage. Let's check out the steps:
1. First, I start off with a doodle in my 4x6 Aquabee sketchbook, using my Pilot Precise V5 pen. The lines are unfinished, to focus on the pose. The idea is to be quick and such a small drawing in a small book adds to that. From here, I scan it and blow it up in Photoshop to print on regular 8.5x11 paper. Once printed, I trace the sketch on my light-box in step 2.
2. This breakdown step is usually done in pen- my Pilot Precise V5, but since the character's design was still unclear to me at this point, I used my Zebra M-402 pencil. I was still unsure about how I wanted him to look, so I would erase bits and start again, experimenting with different designs until I stumbled upon something I liked. Again, had I known the character's design beforehand, this step would have been done in pen.
3. Once I found a design I liked for the character, I slapped it on the light-box again with a new sheet of paper on top and ink my final lines. I would correct a few more mistakes and add more details. For this step, I use my Pigma Micron pens.
The PROS and CONS of this method?
PROS: It allows you to iron out the kinks as you go along. You can do damage and quality control and not rush the art. You can go back to a previous step, unlike doing it all in one go.
CONS: The back and forth extra steps can be time consuming. You also go through A LOT of paper!
Character designs Copyright © Enigma Resolve, LLC. All Rights Reserved.
Tuesday, September 16, 2014
My Tools, Pt. 2

Looking at the picture above, we start at the upper right,
which is my sketchbook. To its lower left, is my Wacom tablet and under them
all is my light-box. I’ll go through each one:
1. 4x6 Aquabee Super Deluxe Sketch Book – Yes, 4x6! I know it’s
small but that is the point. The point is to SKETCH and sketching smaller
decreases time. Sometimes I need to get an idea out very quickly before I lose
it. Since it’s pocket sized, it can go a lot more places with you too. With
today’s scanners, I can always just scan later and blow it up larger for final
details.
2. Wireless Wacom Intuos4 Medium Pen Tablet – When I use
Photoshop, I use my Intuos to do my coloring. The wireless version has a
removable USB cord to connect with the computer through Bluetooth. In addition,
I color with the mouse.
3. ArtGraph LightTracer II Light-box – When I scan and blow up
my sketches, I print them out, slap a fresh sheet of paper over the blown up
sketch on my light-box and I trace. Yes, I TRACE. This technique was learned as
I studied animation in art school. You don’t mess up your art or paper by constantly
erasing and redrawing. Just trace your corrections on top and you have clean final
art. This is also why I only draw in pen, as it is easier to see through the
paper than pencil.
In my next post, I’ll walk through a piece of art that I
completed, explaining in better detail how I used these tools.
My Tools, Pt. 1
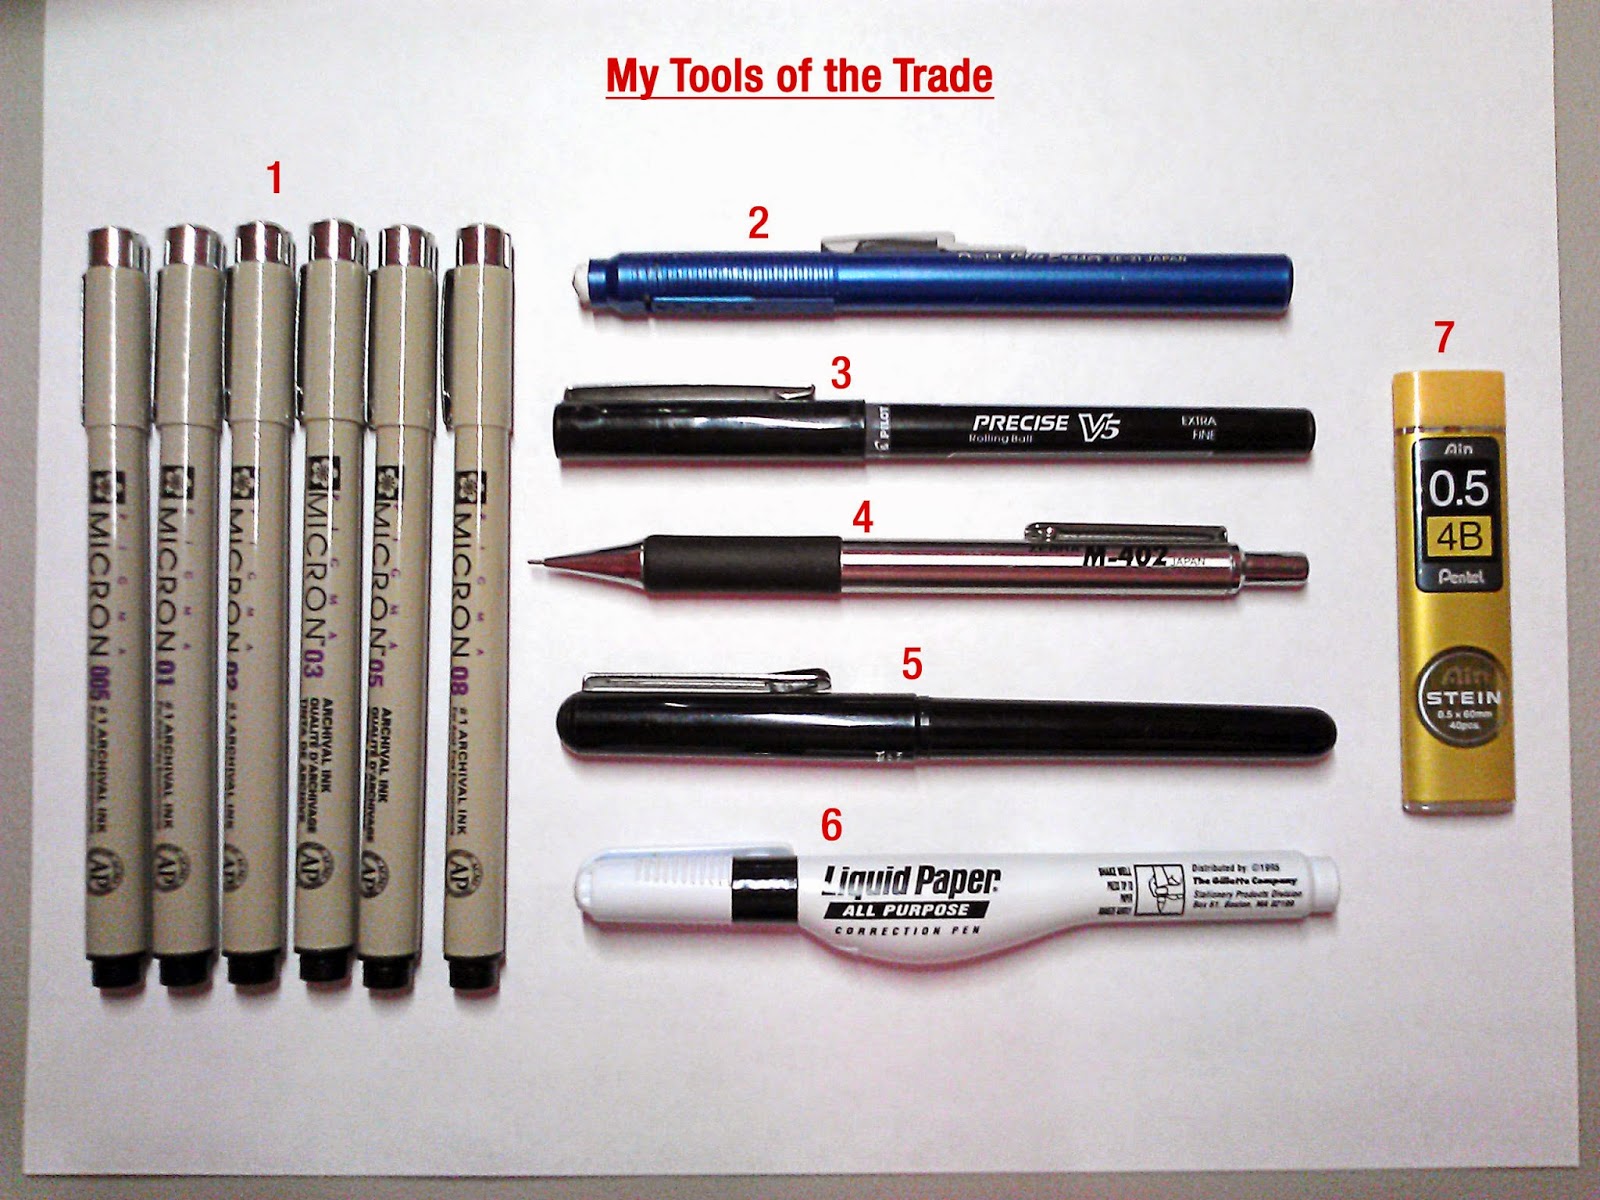
Considering I’ll be posting my art, I think this is a good
time to look at what I use to make the art and describe my work process. Every
artist is different and the tools we use can differ depending on our style and
technique.
These days, my style focuses on clean, contour line art and
digital coloring in Photoshop, so my tools, or LACK of tools, reflect this. This
is what works best for me and I’m not saying that anyone should to go out and
buy only what I use.
Shown in the picture, listed in no real order, are my
weapons of choice:
1. Pigma Micron Set – Blah. Inking. I HATE it. My hand isn’t
steady enough for it; too much drumming I suppose. When I do have to ink, I
pull these puppies out. They are waterproof, have great line quality and come
in lots of sizes.
2. Pentel Clic Eraser – I switched to this bad boy when I was
in 7th grade. I was tired of using up my erasers on pencils and then
you get all the way to the ferrule and it rips your paper. Also,
I bet you didn’t know it was called a ferrule! I hardly use this thing anymore,
because… well, see below.
3. Pilot Precise V5 Rolling Ball (extra fine) – Here is the
‘meat and potatoes’ of my tool set. Oddly, I NEVER draw in pencil anymore, so
this is my No.1 drawing tool. Pencil just doesn’t give me the contrast that I
like and I literally don’t feel comfortable with anything else. The line is
thin and clean. It has very dark, almost watery ink and a fast response, so it
requires good control. It gives me the contrast I need for scanning and
light-boxing*. If this pen were a chick, I’d be on my honeymoon. Forever. Like,
literally. You’d never see me again. Never. Ever.
4. Zebra M-402 Mechanical Pencil– Pencil connoisseurs know that
the 402 is one of the greatest mech pencils ever made. The 402 is super durable
with a stainless steel body and rubber grip that’s comfortable and isn’t too
grippy. People are big on making custom mods to this pencil and I myself
modified the end cap to seal off the eraser, since I’d use my Pentel Clic. I
use this when I absolutely HAVE to draw in pencil.
5. Pentel Brush Pen – This pen is a bit of a legend. It has
REAL bristles, not that lame felt-tip that is shaped into a point. Therefore,
you get the real separation of a brush but it is refillable like a pen. Str8 genius.
6. Liquid Paper Correction Pen – This thing is not only used
for correction, but it has a thin metal point so it can be used to draw thin
white lines over black areas. Positive over negative.
7. Pentel Ain Stein 0.5 4B Lead – If you’re an artist you’re probably
thinking, “4B??? You’re fuckin insane!” Well, let me explain! I know most
artists work in HB to 2B but I do a lot of scan work and light- boxing* so I
need a darker lead. Yes, 4B is soft and smudges more but the payoff is that
it’s easier to see, erase and it scans better.
As you can see, a lot of this can take YEARS to figure out
what does and doesn’t work for you. Just think of the hundreds of things that
I’ve used and discarded that DIDN’T end up on this list. I hope this is helpful
for those starting out or even veteran artists looking for change. The only
other things that I use exclusively for my art production, like Photoshop and
my light-box*, I’ll discuss in a follow up post explaining my actual workflow.
*more on my light-box technique in the next post!
Subscribe to:
Posts (Atom)